Showing posts with label homestead. Show all posts

Monday, December 1, 2014

Brass to Bronze

When we bought our house over four years ago all the light fixtures were cheap, gaudy brass. Every. Single. One.  Shelling out money for new light fixtures when the ones we had worked flawlessly wasn't an option we wanted to choose. So, out came the DIY in us and we painted them! And while we were at it we also painted the floor vents, the wall intake vents, light switch covers and plug outlet covers. Now the house looks much more updated and modern for well under the price it would have cost to replace all of those things.  We used Universal All Surface Spray Paint by Rust-Oleum in the color of Oil Rubbed Bronze Metallic. This stuff is awesome. It stinks to high heaven, but it's awesome. Here is a small sample of our before and afters. We'll be working on the ceiling fans next.

Dining room chandelier:


Bathroom Fixtures:


Hallway Light:


Wednesday, November 19, 2014

Cost and Materials for DIY Butcherblock Kitchen Countertops

Here is a before and after photo of the kitchen counter remodel project. Below is a materials list and the final cost for our project.

BEFORE

AFTER

Now that our butcherblock countertop project has come to a close, I went back and worked up a materials and cost list for anyone wishing to take on this project. We have about 100 square feet of counter space in our kitchen. At Home Depot, the cheapest basic run of the mill Formica countertops were $48 a square foot. What we liked in the "cheap" range was $68 a square foot. So we were talking between $5000 - $7000 including installation. ( That is when I about passed out. )

For our own DIY project we spent about 10 days of work time ( a lot of this time was waiting time for coats of stain and polyurethane to dry ) and just under $260* in materials!!! No, there is not a zero missing from that number. For smaller counterspaces, obviously this will be even cheaper. And the beauty is, I love it more than the store bought ones we were looking at!

Material List
All of our materials were purchased at Home Depot.

Tools List:

  • Mider Saw

  • Table Saw

  • Jig Saw

  • Belt Sander

  • Hand Sander

  • Saw Horses

  • Drill

  • Two 36" Trigger Clamps

  • Putty Knives

  • Tape Measure

  • Rags

  • Box Fans ( to speed the drying process )

Our step by step process:

* This cost is for materials only and does not include any tools you may need.  We did end up purchasing a belt sander and a mider saw for the project and because we wanted them for upcoming projects. So this may or may not be an additional cost if you don't already have these tools or know someone you can borrow them from.

Monday, November 10, 2014

Faux Butcherblock Countertops - Part 1

Materials & Costs | Part 2 | Part 3 | Part 4

When we moved into our house over four years ago the kitchen countertops were in pretty good shape. While they looked nice, they were actually floor tiles. This was nice for aesthetics and clean up, however eventually water and moisture got under the tiles and they started cracking and popping off of the counter. So we decided to upgrade the counters and went off to Home Depot for some estimates. Those estimates came back WAY out of our comfort range of spending so we went back to the drawing board.

You see, we have 100 square feet of counter space. It's awesome having that much space...until you need to replace it all.  We popped off all of the tile from one section of the counter to find that there was a blue counter underneath. So we though, eh, we can live with that until we figure something out. However, once we got the tile off we realized much of the counter was scratched and marked up on some areas. So we thought, no problem, we'll paint it. We had used Rust-Oleum Countertop Paint at the old house before we rented it and it held up well. However that plan was also foiled when we removed more tile to find that some of the coutertops didn't reach the entire length of the counter area and some of it had rotted out from water damage.

THEN, I came across this PInterest project and combined it with this PInterest project. And now we have a huge work in progress. So this is my documentation of our progress as we go along.  So here we go!

This is a before shot of our kitchen from when we replaced the floors a couple of years ago. You can see all the tile that is on the counters along with all the mini-tile pieces along all of the edges and along the backsplash over the sink. All of it has to go.


Here is an up close shot of the tiles:


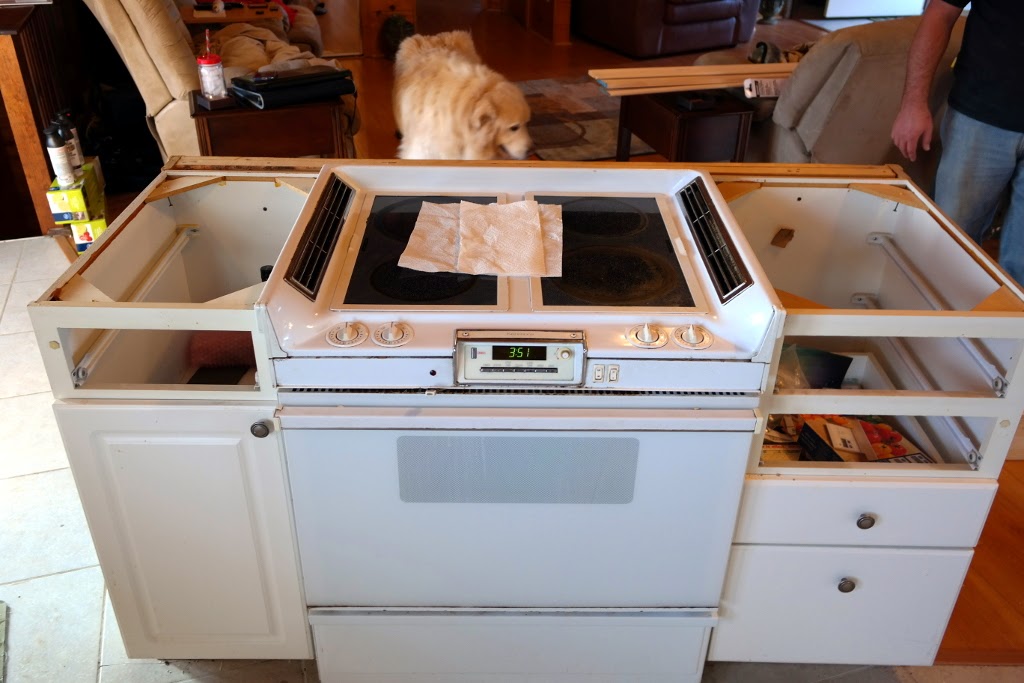
We started with the island section since it's used the most and was the smallest area to experiment with. This is what was under the tile. Again, not bad, but what you don't see is the deep scratches:


So off it came:


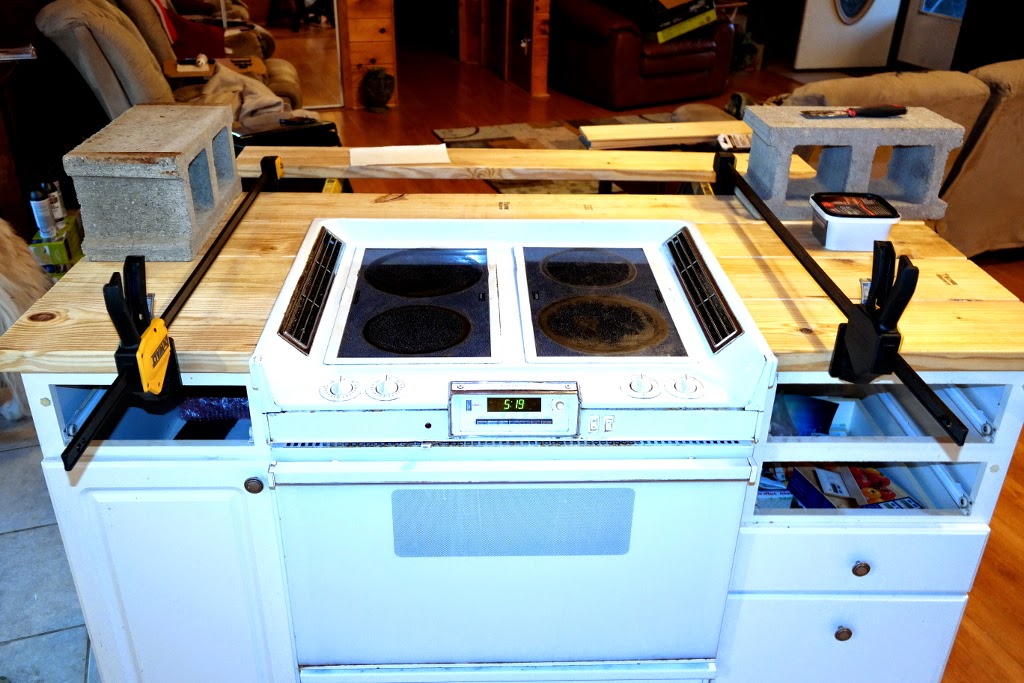
We decided we didn't use the bar stool area of the island enough so we deleted that part out of the new design. Jason is going to add in a fold down bar on the back of the island once we complete the counters so we still have it when needed. So we measured and cut and ended up with our new island base:


Once we had the boards cut and placed correctly, we glued them together using construction grade adhesive. We then set concrete blocks on top to keep pressure on the boards and clamped the boards together until the adhesive dried.


While that was drying, we started removing the counter tiles from the left side of the U shape counter area:


This is where we found that the counter frame is not even with the wall behind the counter. So we're still working out the best way to do this piece, but may put a small lip on the back of the counter, which will help keep things from rolling off. And may eventually put a tiered shelf over it.  But for now, it was more measuring and cutting:


At this point we were pretty exhausted and needed a part for the skill saw before we could continue, so Jason went back to the island section where the adhesive was now dry and began filling the cracks with wood putty so it would be dry by morning to begin sanding.


Materials & Costs | Part 2 | Part 3 | Part 4

Wednesday, October 22, 2014

Fabric Scrap Organization

As I launch into my journey of learning how to sew, only two projects in I have realized I am going to accumulate a lot of fabric scraps that are too small to go back with the original roll. I needed a place in my ever-growing cluttered craft room to keep these scraps accessible and clean, yet out of the way. So I rummaged around the house and found an empty large Pup-Corn dog treat container. Perfect!

I soaked the container in a solution of hot water and Dawn dish soap to get the treat smell out and to help remove the sticker label. I then scrubbed the label residue off with a rough sponge and let it dry. Since it was looking pretty plain and boring I dug into my decorative scrapbook paper and stickers and dolled it up a bit.  Now I have a perfect fabric scrap container that is easy to dig around in and keeps my scraps handy when needed.  And it's pretty to look at, too!


Sunday, July 14, 2013

Craft Room Photos

As promised, here are some better photos of the new craft room setup. Please ignore all the white blobs on the carpet - Giant Dawg is in shedding mode and he is just...everywhere.

This is my scrapbooking, paper crafts, etc area viewed from the doorway:


Same station viewed from the closet:


This one is my painting, wood burning, glass etching station.  The main door leads into our basement kitchen where I have access to a double sink - and beer fridge.  ;)  And also easy access to the basement bathroom.  It really is quite handy!


For the wall storage, I used regular pegboard and accessories from Home Depot.  I was going to paint the pegboard to make it more attractive (it's brown) but got impatient with wanting to get my room together and didn't want to have to wait for primer and paint to dry before hanging them.  So, instead I covered the pegboard with 12 x 12 squares of patterned scrapbook paper.  I just scotch taped each corner and stuck them on the board, overlapping them just a bit.  Then I simply punched through the paper anywhere I needed the hardware hanging accessories.  It was easy, cheap and it's pretty!  And if I get tired of it, I can always put up a new pattern or color scheme.

Scrapbook Station Pegboard:


Wood Burning, Painting, Etching pegboard:


I also now have a closet that runs the length of one whole wall (to the right of the tv, but not shown in these photos) for extra storage bins and to store all my glass pieces that I save up via thrift shopping intended for glass etching and painting.

Thursday, June 13, 2013

Garden Veggie Mania Begins


The garden is already starting to explode! This is yesterday's crop of zucchini and green bell peppers.  Soon we'll also have a variety of onions, eggplant, tomatoes and all kinds of other peppers and green beans.  Yummy!   I bought four of these awesome, large wire fruit baskets for all our garden goodies!

Monday, April 15, 2013

Spring Breeze Scent!


We've been working on saving energy and money lately and spring is here, so what better way than air drying laundry old school style! This set up is nice since it doesn't take up space in the yard and it can be easily removed and replaced with the table umbrella once laundry day is done.  Plus, the table doubles for instant folding space. Since it's just the two of us here, laundry gets done once a week so the portable laundry line can be put up Monday morning and put away with the clothes Monday afternoon.  Perfect!

If you want one of these bad boys you can get one here.

Update: Due to the constant winds we seem to have here, this idea, good in concept, didn't work as good on very windy days.  The wind was too much and knocked the entire table over.  So now we'll be installing the clothesline in the ground.  It's great for gently breezy days though!

Monday, December 5, 2011

New Floors!

One thing I really missed about our old house was the laminate wood floors we installed. Once we moved into the new house in July of 2010 we were back to carpet again. I despise carpet.  I even more despise carpet with all the dogs running in and out with muddy feet, coffee trails from the kitchen to the office and just regular nasty floors over a short time.  Plus these carpets were a light gray, the kitchen and landings were white linoleum, also not good for messy people and pets!

So, the last two weeks have been dedicated to replacing ALL of the floors on the main floor of the house (aside from the bathroom - it was the only decent floor in the whole house).  We put down laminate wood again in the main rooms and got lucky in finding a great match to the knotty pine wood walls.  For the three outer door landings and the kitchen we chose a beige marbled ceramic tile.  And I'm in love!

Here are some before and after photos - click for larger view.

Loft View


Living Room 


Front of Living Room After:


Kitchen After


Bedroom After

Friday, July 30, 2010

Settling

Finally - we're starting to settle into the new house.  We finished up work on the old house this week and the renters move in on Monday.  I'll be so glad not to see that place for a while.  The dog fence posts are being installed today and will continue on Monday and possibly Tuesday. Hopefully by end of day Tuesday we will have a completed fence for these dogs.  They need their running room and ability to free roam!  They are getting a little more than an acre all to themselves with plenty of trees and open areas.  They are going to love it!


We managed to capture Big Worm about a week after we actually moved.  He's elusive and we had to go to the house at 10:30 one night in order to get him. By that time he was pretty hungry so I was able to coax him into eating some canned food inside his carrier.  He was pretty leery but hunger won out and I was able to shove him in the cat carrier and close the door before he was able to remove one of my appendages.  He was not happy at all.  Once we got him to the new house, after much ruckus and mewling in the truck, we let him out of the carrier and he took off.  We didn't see him for three days.  Finally I found his hiding spot under the back porch.  Jason fed him some tuna laced with dewormer and we Frontlined him for fleas and since then he's been hanging with us on the porch in the evenings.  As you can see, he was not a happy camper at first, but he's coming around.


Big Worm Emerges


We're loving all the wildlife that we've been seeing.  We have a resident pair of humming birds that we see on a daily basis.  Lots of rabbits, frogs and dragonflies.  Unfortunately also a lot of houseflies that are driving us nuts.  We've seen a few deer and woke up one morning to 3 wild turkey strutting around the yard.  Now that things have settled down I'll be trying to get some photos of some of the creatures we see.  Here is a Waved Sphinx Moth that spent an entire night and day on our screen door.


Waved Sphinx Moth


Hopefully I'll get back to my regular postings again and I plan to start Project 52 up soon as well.  Happy Friday!  

Monday, July 19, 2010

We Made It!

It's been an eventful weekend ( well the whole past month has been ), but we're finally here!  With the gracious help of lots of friends we made quick work of the move.  We only had two furniture casualties - one bookshelf lost to I-71 and one end table glass insert got shattered - all in all, not to shabby!


I've gotten all the major unpacking done - all that is left is little stuff that I don't really know what to do with yet and my entire craft room, which will likely be a winter project.  The office is still partially in a shambles, but we're up and running, which is the important part.


The dogs are loving the new place already, even though they can't free roam the yard yet.  We're getting a fence estimate this week to at least get an area for the four beasts to romp in until we get around to fencing the majority of the 11 acres.  For now we have two 20 foot screw in the ground leads for Buddy and Hardy.  Blue and Lois stick close so we don't worry about them so much.  Here's Buddy lounging at the end of his lead:


Giant Dawg Chillaxin'


Buddy in his new front yard


Lots more photos will be coming as soon as I get all settled and have time and energy to get outside.  And inside photos are coming as soon as the place no longer looks like it was run over by a Tasmanian devil.

Friday, July 9, 2010

Almost Home Sweet Home!

A week from tomorrow this will officially be Home Sweet Home!
( Photos by K. Kemble )


101_0302


101_0271


101_0289


All photos are here.


We're pretty much all packed and ready to go.  The only things left unpacked are things still in use.  We were able to go ahead and take several loads over to the new house and store them in the large shed until moving day.  The sellers have to be out by 10pm next Friday, but we're hoping they are out before then. It all depends on how long it takes them to get moved into their new house.  We're just anxious to get settled and hoping for a few extra days to get the old house in better shape for renting without being rushed during moving weekend.


Once we get moved and settled a bit I'll post updated photos with our furnishings and arrangements.  It's going to be a busy week but I took a week off to get all unpacked and settled in the new place.  Internet may also be hit or miss during that time, depending on how long it takes to get the new connections set up at the new house.


Lots more photos coming soon!  Hopefully lots of wildlife too.  With 11 acres I'm bound to get lots of deer, turkey and bird photos in the near future!  :)

Wednesday, May 26, 2010

Three Day Weekend - Coming Up!

Ahhh!  Memorial Day weekend - finally it's almost here!  Being the first work day off since New camping at Dog Woods, but this year we'll be hanging at the house.  We'll be doing a small cookout on Saturday afternoon with some porch dwelling and cornhole on the agenda. And it will be the last time to hang at this house on Memorial Day weekend!  I've already warned them that there are boxes and corners of disaster everywhere.  I have managed to keep the guest room box and clutter free though.

This is one of my most looked forward to long weekends.  And as a plus, Jami & Larry, our greatest friends from Indy, always come down for the long weekend and hang out with us.

Portia is supposed to be home visiting starting Monday for a week or so since this Friday is her last day of school. She may be getting a job at the local pool where she lives, which would be wonderful for her, but will limit her free days during the summer.  But what better place to work in the summer than at a pool and make some money!

As a house update, the appraisal was yesterday on the new house and we should know the results by the end of this week.  Waiting is the hardest part, especially since once we find out if the appraisal came through ok we'll get a closing date soon after.  And I'm very anxious to know some dates so I can plan more efficiently.  In the meantime I think I've boxed almost all unnecessary items and thrown out almost all unwanted items.  Thanks to my brother, almost all the painting is done and we only have a small list of home repairs left to do.

Things are moving along!  We also have a potential buyer for Dog Woods and the camper, which would be an added bonus.  I will miss it, but there is no point in living on 11 acres and keeping a 6 acre getaway when we'll be literally living in a get-away all the time - with running water and plumbing, no less!